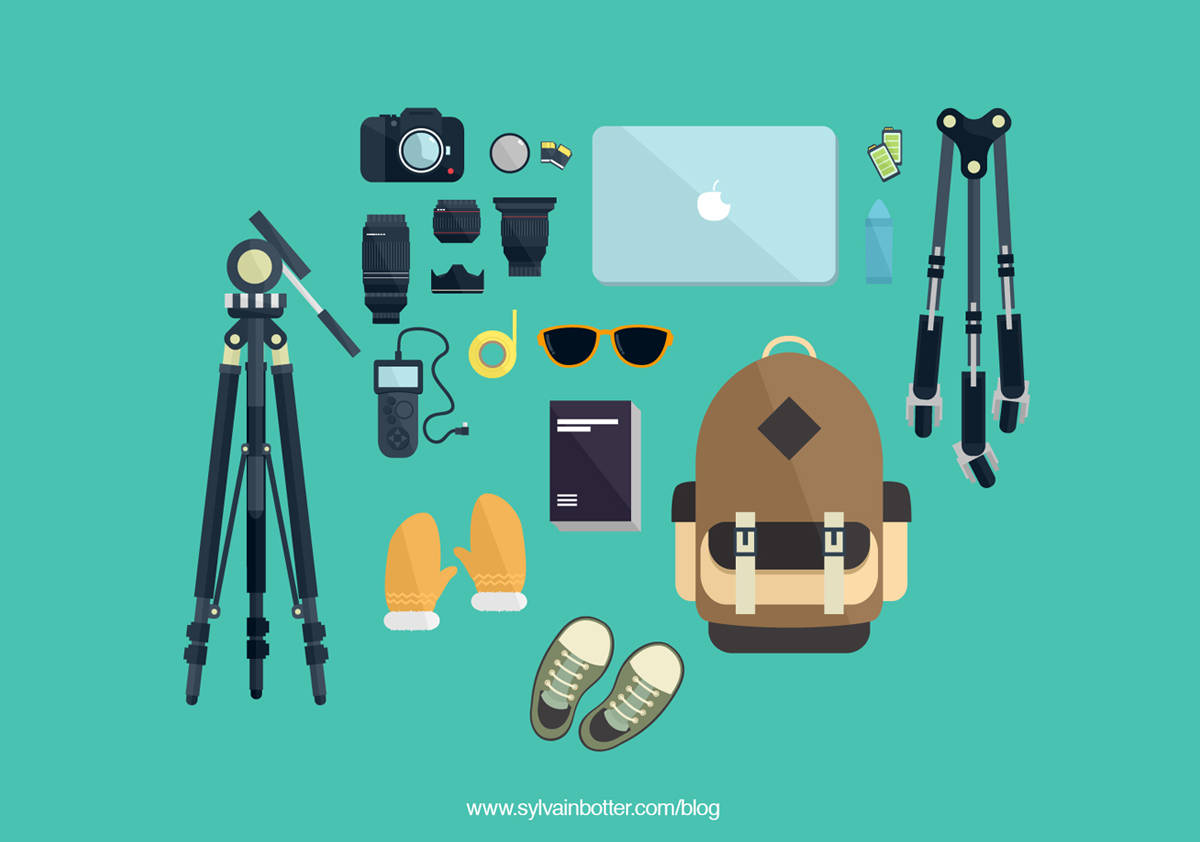
15 indispensable pieces of equipment to take with you when shooting a hyperlapse film
This hyperlapse tutorial (motion time-lapse) is the first in the chapter of a series of tutorials « HOW TO SUCCESSFULLY SHOOT A HYPERLAPSE VIDEO? ».
After years of practice, I acquired a considerable amount of experience and decided:
As an professional video maker, I want to share my knowledge in this field so all of you can use this exciting technique.
I live in Lausanne in Switzerland as a freelance designer and videographer, and I am passionate about graphic design, photography and video.
To learn more about my career, don’t hesitate to read my biography by clicking here: https://www.sylvainbotter.com/about
By the way, if you didn’t have the chance yet to read my article HOW TO SHOOT A HYPERLAPSE VIDEO? Planning and reconnaissance of the area , I invite you to do it after this one.
This is my first tutorial, and we’re going to talk about:
The most important equipment for a hyperlapse shoot.
First:
What is the difference between « time-lapse » and « hyperlapse »?
Here’s a short explanation:
TIME-LAPSE
Time lapse is a succession of photos taken exactly in the same place but at regular intervals. Though they’re not just simple photos, by reading this sequence of images at 24 image per second, we get a time lapse effect that is especially interesting in the case of a crowd, a moving vehicle or even the clouds in the sky.
HYPERLAPSE
Hyperlapse is simply a time-lapse in motion. The majority of time-lapses are created with a digital single-lens reflex cameras (DSLR camera) on a tripod, on a dolly or glidetrack system. Thanks to the hyperlapse, you can go even further. In fact, when taking hyperlapse shots, your camera will travel over about ten meters, which will enhance the time-lapse effect of your video. The hyperlapse you will get an even more captivating result.
The 15 points to remember to make your hyperlapse video shine:
1. The tripod stabilize the shot
To record a hyperlapse video, you need to choose a relatively heavy tripod for stability.
You will be taking photos for a long time, and you don’t want blurry images in your video sequences.

2. The camera makes all the difference
Go for a full-frame DSLR camera in order to get an image with high resolution.
In fact, later on,
You will need to crop the image, which will result in an even smaller one than the original.
Therefore,
the bigger the image format is, the easier the post-production handling will be.

3. The lenses make or break the image
A few good lenses are just as important, if not more important than the camera body.
This way, you can easily switch between lenses in order to adapt to every situation.
Don’t hesitate to use a fisheye or a wide-angle for hard angles, a telephoto for inaccessible locations, as well as a lens with a zooming ability for some transitions.
This way, you can easily switch between lenses in order to ADAPT to every situation.

4. Don’t forget the lens hood
Get a lens hood for ALL those lenses. It’s important.
Moreover, this will slightly sharpen your photos so don’t overlook this point.

5. Get an intervalometer for your camera
Get a device that calculates and sets intervals for your time-lapses:
An intervalometer.
Polaroid’s interval is rather reliable and affordable: intervalometer on amazon

6. Chalk it up
Mark the spot where you put your tripod with sidewalk chalk for consistency.
Imagine you wish to shoot a time-lapse or a hyperlapse by alternating day and night.
In the day, mark the position of you tripod with a chalk.
At night, it will make it easier, much EASIER.
You can then put your tripod back in the same spot without having to spend one hour.

7. Go for a dolly tripod
To shoot a hyperlapse, a dolly tripod may be useful in order to follow a straight trajectory as long as the ground is flat and somewhat smooth.
Thanks to the dolly tripod, you won’t have to take your tripod with you everywhere (thus less exhausting) and it is possible to lock the wheels in the same direction in order to follow a straight line.
Here’s an excellent dolly tripod at a very low price.
It’s a Ravelli.
Available on Amazon for a few euros.
Click here to buy a dolly tripod

8. Buy some ND filters to make your life easier
ND filters, a.k.a grey neutral filters or neutral density filters.
They are ideal for long exposures.
Their role is to darken your image (a little bit like sunglasses) to get a more « neutral » color palette or to get more details in the sky.
In case of a time-lapse, the filter allows to extend the time of exposure for the same shoot while getting a certain motion blur effect for the dynamic elements of your shot.
Imagine a walking crowd.
If you don’t use nd filters, the result will be sharp.
Every person in the scene will be so sharp that you will not have the feeling of a smooth movement.
But, if you use a nd filter. Each person will be a bit blurry and the movement in tne final scene will be more fluent, more smooth.

9. Get some batteries
Power is important to photography and no one wants to run out of juice in the middle of a shoot.
You should always bring spare batteries for your SLR, as well as some for your interval.

10. Take spare SD cards
Time-lapse photography uses a lot of space.
A LOT.
Take at least 64 GB of memory with you. It would be a shame to have to go back home to unload your card thus losing precious time for your shoot.

11. Remember to bring adhesive tape
Adhesive tapes may not fix everything, but they can be really useful.
Like to attach your intervalometer to the tripod on a windy day.

12. Good shoes (your feet will thank you later)
That’s right:
Shoes.
You will be walking all over, so shoes have just become photography equipment.
Remember that hyperlapse means “Time-lapse” in motion, meaning YOU are in motion.

13. Adapt to the season
Again:
Not your typical photography equipment, but still essential.
If you want to shoot your hyperlapse film during the winter, protect yourself from the cold with gloves, a scarf and a hat.
If you’re shooting during summer, don’t forget to bring sunblock and enough water to avoid dehydration.

14. The backpack is important
Here’s the deal:
Photography equipment is expensive and bulky.
To make your shoot easier (and more portable), bring a backpack.
Put all your various bags, cases, and equipment into it to make trekking around for your shoot a breeze.
Choose a backpack that fits you well so it can be practical without hindering you.

15. Take some pass-times with you
Hyperlapse shoots can take a long, LONG time.
Take a book or a tablet with some movies in it with you. That way, you won’t get bored in the intervals.

That’s it!
Thanks to this first hyperlapse tutorial, now you know all the equipment needed for a successful shoot.
But wait, there’s more!
Just not in this tutorial.
Obviously, there are other elements to take into consideration, and some other knowledge you need to become a successful time-lapse or hyperlapse photographer.
I suggest:
That you follow my series of tutorials to learn the art of the hyperlapse video.
If you want now take the next step, you can start by reading my second article:
HOW TO SHOOT A HYPERLAPSE VIDEO?: Planning and reconnaissance of the area
Or, you can also watch one of my creation, a nice example of Hyperlapse film.
Here: